
Step-by-Step Guide · Updated May 2026
Upgrading your jacket's stock foam or placeholder armor to SAS-TEC CE Level 2 armor takes 10 minutes or less. Below: which inserts go where, how to swap them, and what to check before your first ride.
What you'll need · The three inserts most riders upgrade
If your jacket has Level 1 foam pads (or worse, uncertified mystery foam aka "back pad"), these three SAS-TEC inserts are the Level 2 upgrade path for your riding safety.
For the back pocket · EN 1621-2 Level 2
SC-1 B47-2 Central Back Protector
The single-piece spine protector. Universal fit, drops into any standard back pocket. Most jackets ship with Level 1 foam in this slot or nothing at all— this is the single highest-priority swap.

SAS-TEC · CE Level 2
SC-1 B47-2 Back Protector
$43 →
For shoulders + elbows + back · 5-piece kit
Tripleflex Upper Body Set
Five SAS-TEC Tripleflex protectors covering back, shoulders, and elbows — all CE Level 2. The single-purchase route if you're upgrading the entire upper body of a stock jacket (most have Level 1 inserts at every pocket, and often no back protector). Closes the "Level 2 back + Level 1 shoulders" mismatch that's the most common stock-jacket flaw.
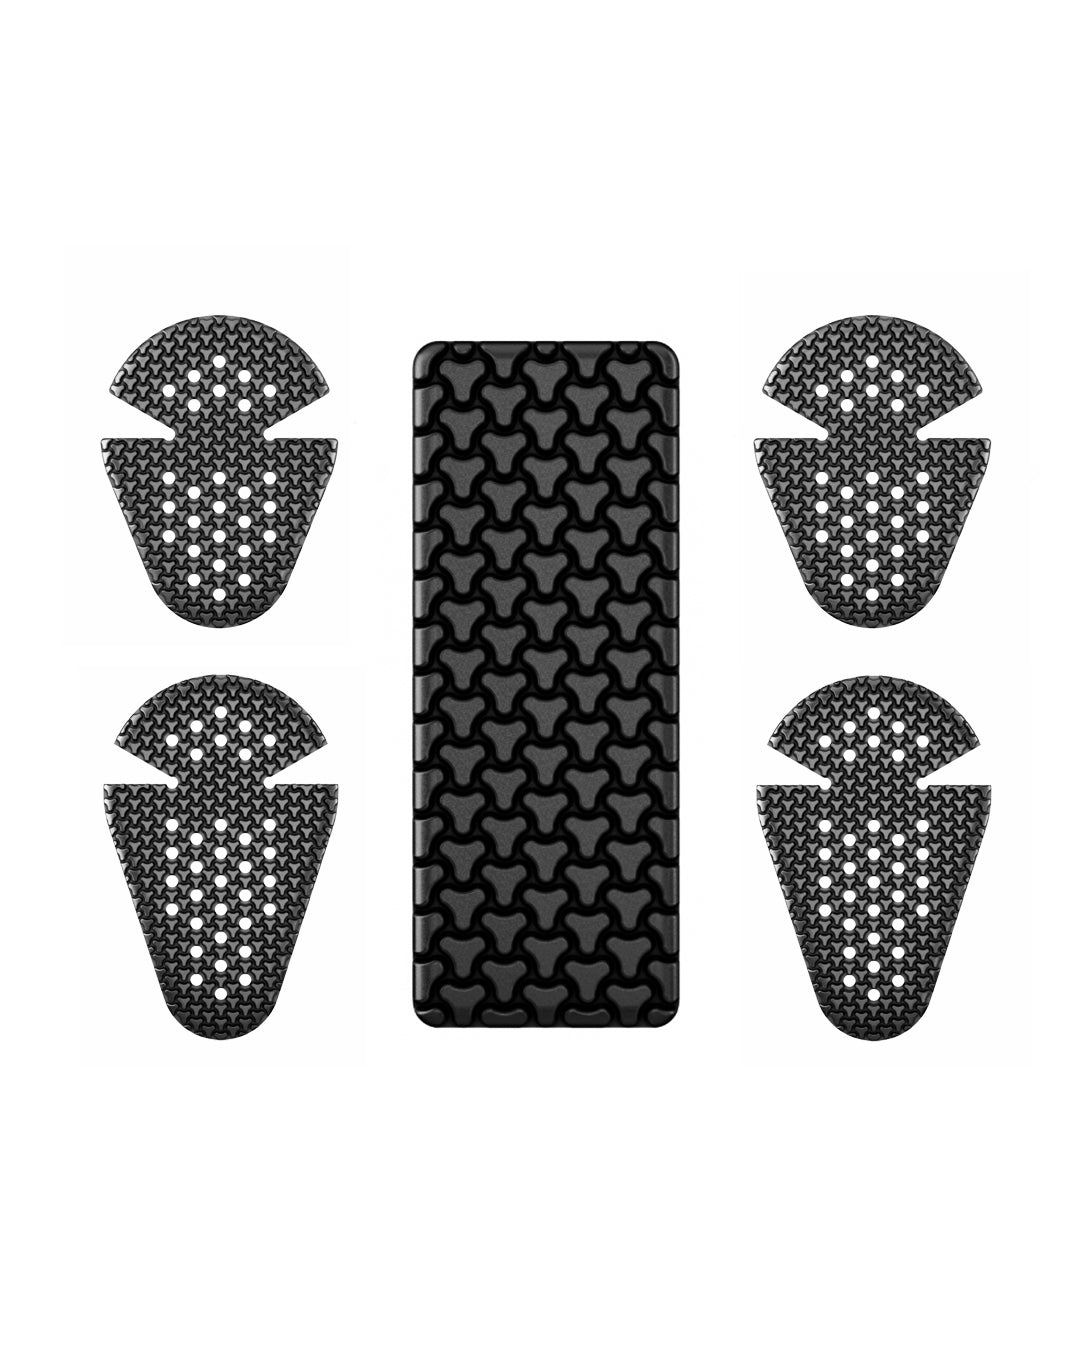
SAS-TEC · 5-Piece Set · Level 2
Tripleflex Upper Body Set
$94.50 $105 →
For the chest pocket (if your jacket has one) · EN 1621-3
SAS-TEC CP7 Two-Piece Chest Protector
Two-piece chest insert that fits jackets with chest armor pockets. Many jackets have the pockets empty from the factory — this fills them. EN 1621-3 is a separate CE category from the back/limb standard.

SAS-TEC · Chest · EN 1621-3
Two-Piece Chest Protector
$28 →
Time required: roughly 1 minute per pocket. Best tactic: turn your jacket inside out on a flat table with good lighting.
Step-by-Step: How to Swap Your Armor
The process is the same whether you're swapping back, shoulder, elbow, hip, knee, or chest armor. Six steps, end to end.
Step 1
Find the armor pocket
Most armor pockets sit on the inside of the garment, accessed by an internal flap or zipper. Everything is easiest to do with your jacket turned inside out. But remember, you'll also want to place your armor in the correct orientation.
Common locations:
- Back pocket: Inside the back panel, usually a long zipper or hook-and-loop flap running vertically along the spine.
- Shoulder pockets: Inside the shoulder padding
- Elbow pockets: Inside the forearm.
- Chest pockets: Inside the front zipper area, two separate pockets (one per side of the chest) or one singular pocket in a pullover garment.
- Hip + knee pockets: Inside the pant legs, near the joints.
Step 2
Pull the existing insert
Unzip or unfasten the pocket gently. Slide the old insert out. Save it for one minute — you'll need it for size comparison in Step 3.
If the old insert is labeled with an EN 1621 standard, check the level. If it says "EN 1621-2 Level 1" or "EN 1621-1 Level 1", you've confirmed it's certified but at the lower threshold — exactly what the swap upgrades. If the label is missing the EN reference or just says "CE-approved," the existing armor isn't actually certified. Look for the motorcycle icon. It's best to wear reputable brands like SAS-TEC, D30, Rheon, Alpinestars.
Step 3
Compare sizes side by side
Hold the new SAS-TEC insert against the old one. The dimensions should be within 5–10% of each other. Specifically:
- Length and width: The new insert should be no smaller than the old one (smaller = parts of your body aren't protected). If it's too large it might not fit in the pocket.
- Thickness: SAS-TEC Tripleflex inserts are typically thinner than the bulk foam they're replacing. That's expected — viscoelastic foam achieves Level 2 protection at lower thickness.
- Shape: Most modern armor uses the same anatomical curves. Check that the curvature roughly matches.
If the new insert is noticeably smaller than the original, it may be a Type A (reduced coverage) protector when your jacket was designed for Type B (full coverage). Either return it for the Type B version or check whether your jacket pocket can accommodate the smaller insert without it shifting during the ride.
Step 4
Slide the new insert in
Orient the new insert with the TPU-coated fabric face outward (away from your body). The "elements" (knobby grid) viscoelastic side sits against you. This is what allows the armor to deform inward on impact, absorbing energy by compressing that grid onto itself rather than transmitting it through your body.
Slide the insert all the way into the pocket. You'll want it to fit snug but without tons of tension across the pocket. It should be able to contour around your joints. Check for extra Velcro inside the pocket to allow for micro adjustments. You may be able to open up into a larger region of the pocket, or close it down if it's too much space.
Step 5
Close and secure the pocket
Zip or hook-and-loop the pocket fully closed. An insert that can shift inside the pocket during a slide is an insert that may not be where you need it on impact. The closure should not feel overly strained.
Step 6
Wear the jacket and check fit
Put the jacket on, zip it up, and:
- Bend forward like you're on a sport bike. The back protector should follow your spine, not bunch above or below it.
- Bend your elbows past 90 degrees. The elbow armor should sit directly over the elbow joint at riding position, not above the joint when bent.
- Shrug your shoulders. The shoulder armor should stay on the shoulder cap.
- Reach forward. The chest armor (if installed) should sit flat against the chest, not pinch at the collarbone.
If the armor sits in the wrong place when you're in riding position, the jacket or pants may not be the ideal fit for you. This most often happens when the sleeves are too short or long, or the inseam of the pants are too short or long. You want the pockets to land along your high-risk zones. If the armor sits in the wrong place, consider getting a new jacket or pants, or taking it to a tailor to move the armor pockets (if possible).
Fit Notes: Will SAS-TEC Inserts Fit My Jacket?
The short answer: yes, almost certainly. Before buying, check the dimensions of your current armor pockets against your new armor. Keep in mind that flatter looking pads will contour once in place, so it is okay if they seem slightly wider or taller. Most major motorcycle gear brands have converged on a standard-fit armor pocket standard over the last decade. SAS-TEC inserts are sized to the same anatomical dimensions that most manufacturer pockets are designed around.
By brand category:
- European premium brands (Pando Moto, REV'IT!, Dainese): Generally use universal-fit pockets. SAS-TEC inserts are explicitly designed for this market and tend to be a clean drop-in.
- American premium brands (Klim, Alpinestars, Held): Mostly universal-fit, though some Alpinestars and Klim models use proprietary insert shapes designed for their own brand armor. SAS-TEC will fit the pocket but may shape slightly differently than the stock insert.
- Mid-tier and casual brands (Beyond Riders, Speed and Strength, Fly Racing, Merlin): Generally universal-fit. The stock inserts are usually thinner foam, so SAS-TEC Tripleflex (which is thinner than typical bulk foam) often fits with extra room.
- Older jackets (pre-2015): Pocket standards were less consistent. Measure the existing insert and compare to SAS-TEC published dimensions before ordering. If your jacket has a removable foam shape rather than a pocket, you may need to use the original insert as a template.
If you're unsure whether your jacket is compatible: pull the existing armor and measure the length and width. If your jacket uses a pocket between roughly 25-30 cm tall × 18-22 cm wide for the back, you're in standard universal-fit territory. Shoulder and elbow pockets are smaller (typically 15-20 cm × 12-16 cm). SAS-TEC Tripleflex sizes match these ranges.
When in doubt, photograph the inside of the pocket alongside the existing insert and email us — we'll confirm fit before you order.
Common Problems & How to Fix Them
"The new armor is stiffer than the old one"
SAS-TEC Tripleflex feels rigid at cooler temperatures but flexes with body heat. Wear the jacket for 5-10 minutes before testing range of motion. The viscoelastic foam reaches ideal flexibility around body temperature — that's part of how it achieves Level 2 protection while staying thin. If it's still rigid after warming up, the insert orientation may be wrong (TPU fabric side should face out).
"The armor sits in the wrong place when I'm bent over"
Common issue with elbows specifically. The pocket sits in the right place when your arm is straight, but the armor migrates above your elbow when bent. Two fixes: (1) Most armored jackets have an extra piece of Velcro for adjustments around the elbow — try it out. (2) Make sure you like the placement of the armor pockets in the first place. It's okay if they seem a little low at rest. A good fit would mean they cover your impact zone while you're in a riding position.
"The pocket won't zip closed with the new insert in it"
Sounds like they're too big. We have a scaled down version of our standard set, check it out here.
"My old insert had no label at all"
That means the old insert wasn't certified— that's not 3rd party tested. This is depressingly common in stock motorcycle jackets at the mid-price tier. The good news: now you have certified Level 2 armor. The actionable advice: throw the old insert away or use it for something else, like a gardening kneeling pad.
Before You Ride: Quick Final Check
Three things to confirm before the first ride with your new armor:
- Pockets fully closed. Every zipper or Velcro flap secured. Keep that armor exactly where you want it when you need it.
- Armor sits where it should in riding position. Sit on the bike (or mimic the position standing). Back armor follows the spine. Elbows sit on the joint. Shoulders cover the cap. Chest sits flat.
- Full range of motion preserved. Reach for the bars, twist the throttle, check mirrors, look over your shoulder. Nothing pinches or restricts.
If all three pass, you're ready. The first ride may feel different — Level 2 armor is more substantial than the foam that came with the jacket — but the feel becomes invisible within the first few miles.
FAQ
Will any Level 2 SAS-TEC armor fit my jacket?
Almost always yes if your jacket has dedicated armor pockets (most modern motorcycle jackets do). The universal-fit standard most brands use is what SAS-TEC inserts are sized for. The two exceptions: very old jackets (pre-2015) sometimes used non-standard pocket shapes, and a few high-end brands (Alpinestars Tech-Air, Dainese D-air, Klim Hydration) use proprietary insert shapes designed around the brand's own armor. If you're unsure, measure your existing insert and compare to the SAS-TEC product page dimensions.
Which SAS-TEC insert goes in which pocket?
Each SAS-TEC insert is labeled with a zone code on the CE label: CB or FB for back, S for shoulder, E for elbow, H for hip, K for knee, CP for chest. Match the code to the pocket location. Some inserts (the universal-fit shoulder/elbow style) carry both S and E codes — they're shaped to work in either pocket.
Do I need to replace my whole jacket, or just the inserts?
Just the inserts, in most cases. The jacket itself doesn't lose impact-protection ability over time — that's all in the armor. The garment fabric does degrade (UV, abrasion, wash cycles), so if your jacket is also 5+ years old and showing wear, replace it as a separate decision. But the armor swap alone is the high-impact, low-cost upgrade most riders are missing.
How often should I replace SAS-TEC armor?
Replace immediately after a significant impact — viscoelastic foam deforms permanently when it absorbs a hard hit, even if it looks visually fine. Replace if it has been subject to extensive UV exposure; direct sunlight will degrade it over time (inside your gear is fine). For uninvolved armor, manufacturers typically recommend replacement every 5 years, sooner if the armor lives in a hot or humid environment that accelerates material aging. The Tripleflex line uses a multi-impact-rated formulation that handles repeated low-energy impacts (drops, minor falls) without degrading, but a high-energy crash still warrants replacement.
Can I wash my jacket with the armor in?
No. Always remove the armor before washing. Detergents and hot water can degrade the viscoelastic foam, and the agitation can deform the protector shape. Pull the inserts before any wash cycle (machine or hand), and re-insert when the jacket is dry. The armor itself can be wiped down with a damp cloth as needed.
My old armor doesn't have a CE label. Should I just replace it?
Yes. If the existing insert has no CE label citing EN 1621-1 or EN 1621-2, it's uncertified — not verified impact armor. Replacing it with certified Level 2 SAS-TEC is one of the highest-value upgrades you can make to a stock motorcycle jacket. Full CE label decoder →
Can I mix SAS-TEC armor with armor from other brands in the same jacket?
Yes, as long as each piece is independently CE-certified. There's nothing about EN 1621 that requires armor to match brands across body zones. Many riders run D3O at the shoulders and SAS-TEC at the back (or vice versa) based on what fits their jacket pockets best. The certification is per-piece, not per-set.
Upgrade your jacket today
Back · CE Level 2
SC-1 B47-2 Back Protector
$43 →
5-Piece Set · Level 2
Tripleflex Upper Body Set
$94.50 →
Chest · EN 1621-3
CP7 Chest Protector
$28 →
Or browse the full SAS-TEC armor collection →
Related Reading
- CE Level 1 vs Level 2 Armor — why the upgrade matters (the actual kN numbers)
- What does EN 1621-1 mean? — the limb-impact standard explained in detail
- Best Motorcycle Body Armor 2026 — full buyer's guide with 10 picks across impact + slide


